Run Traffic/Road Sign Detection Model based on YOLOv11 with AI accelerator on ROS 2 (Robot Operating System) for a Raspberry Pi 5 Robot Car
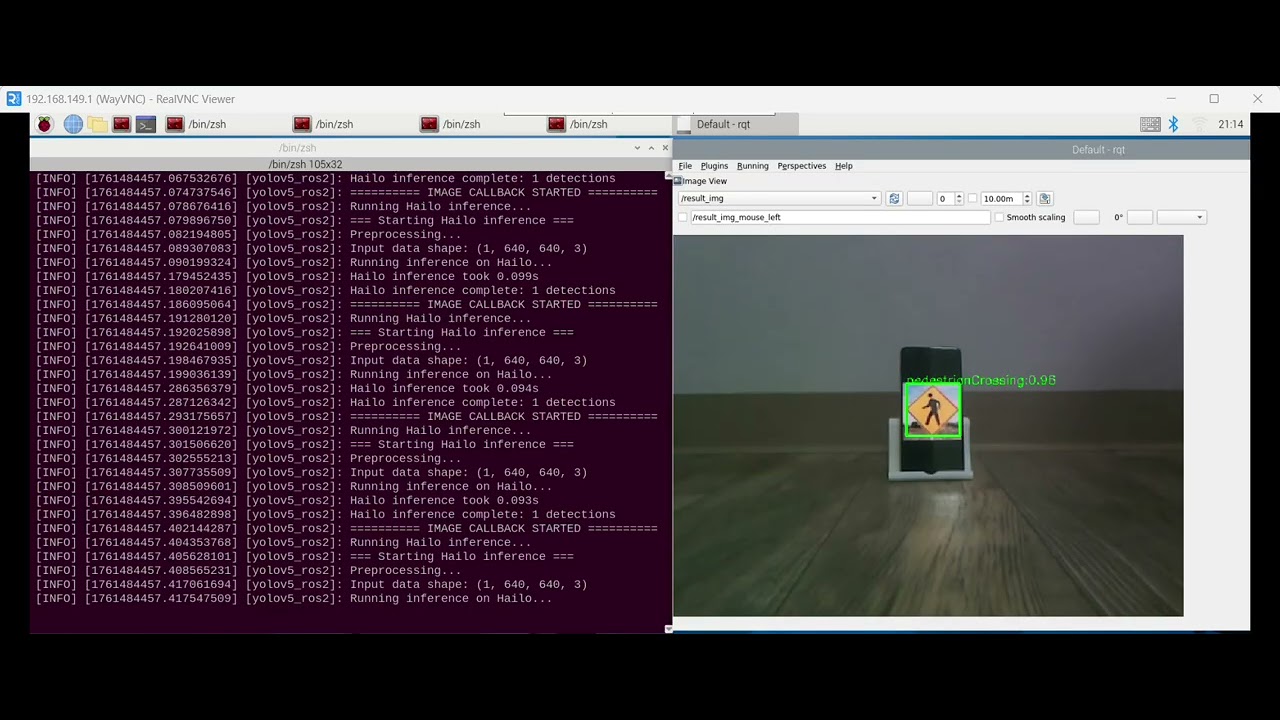
I am providing a workflow that can significantly improve model inference latency and accuracy on the Hiwonder Robot Car using the Raspberry Pi AI HAT+. The comparison shows that inference time is reduced from ~3000 ms (on the Pi CPU) to ~100 ms (on the AI HAT+), a 30X gain. Also, the signs are difficult to detect on the Pi CPU due to lower inference precision. This is completely solved by running on the AI HAT+. This project is continuously being updated, and I will add the complete results after testing the implications for autonomous driving mode in a sandbox setting.
Push the Hailo AI HAT+ GPIO stacking header onto the Raspberry Pi's GPIO pins, and insert the ribbon cable into the PCIe port. Then, use four spacers to secure it on the main board. Please refer to the official documentation for detailed installation steps.
https://www.raspberrypi.com/documentation/accessories/ai-hat-plus.html
Note that because of the height limit of the board space component for this robot car, the AI HAT may need to be installed upside down. I used 16 mm spacers, but consider using a shorter spacer (e.g., ~ 12 mm) so there is enough space to install it normally.

Please install Raspberry Pi OS based on Debian 12 (Bookworm), not the latest (13 Trixie), as the repo has not been fully synced.
sudo apt update && sudo apt upgrade

sudo apt install hailo-all
hailortcli fw-control identify
Executing on device: 0000:01:00.0
Identifying board
Control Protocol Version: 2
Firmware Version: 4.23.0 (release,app,extended context switch buffer)
Logger Version: 0
Board Name: Hailo-8
Device Architecture: HAILO8
pip install --upgrade ultralytics "numpy<2"
(numpy version >=2.0 can cause issues)
Note that for production, you need to reinstall a ROS 2 warp for YOLO models and rebuild, for example, from here: https://github.com/mgonzs13/yolo_ros
For demonstration purposes, I used the most straightforward approach: directly updating the dependencies.
The datasets can be downloaded from Roboflow:
https://universe.roboflow.com/kaggle-road-sign-dataset/lisa-bjgh5
Note that the signs usually take a very small portion of the images in this dataset, so a multi-resolution training is needed for robust detection. In the latest version of YOLO, many CLI syntaxes were changed. Here is what I used as a reference:
yolo train detect data=data.yaml model=yolo11l.pt epochs=300 lr0=0.0001 batch=10 imgsz=640 optimizer=AdamW scale=0.5 fliplr=0.5 multi_scale=True
After training, convert the model weights file from one of the stabilized runs ("last" run is usually better than "best" run) into ONNX format and then quantize the weights with Quantization-Aware Fine-Tuning enabled for higher precision. You need to register a development account on the Hailo development zone to download the Hailo8 AI Software Suite Docker and run it on a PC (preferably with a GPU installed, and the VRAM should be at least 16GB).
hailo parser onnx --hw-arch hailo8 yolov11lm.onnx
hailo optimize --hw-arch hailo8 --calib-set-path ./calibration\_images.npy yolov11l.har
hailo compiler --hw-arch hailo8 yolov11l\_optimized.har
Note that the calibration dataset is created by randomly selecting 1024 images from the training dataset. Then, stack the 3-D arrays in the first axis in NumPy and export to npy format. This process usually takes some time (~ 1 hour) and generates an optimized .hef file for the AI HAT, which can be copied to the Raspberry Pi. Copy this file to
~/ros2\_ws/src/yolov5\_ros2/config
The last step is to modify the scripts provided by HiWonder so that the model inference will be run on the AI HAT instead of the Raspberry Pi CPU. Due to the manufacturer's restrictions, I can only share the modified code here.
Change the "device" parameter from ROS2 Node to "hailo" Change the "model" parameter from ROS2 Node to "yolov11l.hef"
Replace the yolov5_detect.py script with the one provided in this repo.
~/.stop\_ros.sh

ros2 launch peripherals depth\_camera.launch.py
ros2 launch yolov5\_ros2.launch.py